How I use VSCode, VSTS and GitHub to develop Azure ARM Templates
These days I live in Visual Studio Code (VSCode), it’s the place where I go to write my Azure ARM templates, where I create my PowerShell scripts, and most of all create my blog articles in markdown.
Developing and deploying Azure ARM templates can be accomplished on your workstation, but you don’t share your code with the community. I thought I would share how I work in VSCode with GitHub and Visual Studio Team Services (VSTS).
The three tools mentioned above working together about allows me to have source control, code versioning, testing and debugging.
Here’s my setup:
Visual Studio Code
VSCode is an open source code editor that includes support for debugging, embedded Git control, syntax highlighting, intelligent code completion, snippets, and code refactoring. It’s pure awesomeness. You can download here: https://code.visualstudio.com/
I also have the following extensions installed in VSCode:
GitHub
GitHub allows you to version your code and allows you to collaborate with others using features such as bug tracking, feature requests, task management, and wikis for every project. You can create a free account here: https://github.com
My GitHub repositories contain all the Azure ARM templates that I share. It is also integrated with Visual Studio Code to allow me to manage my code. All my public repositories can are found here: https://github.com/erleonard
As a side note, GitHub allows you to host your website for you or your projects. I created a one-day conference called satAzureday, and the site was created in its own GitHub repository and hosted by GitHub Pages.
Visual Studio Team Services
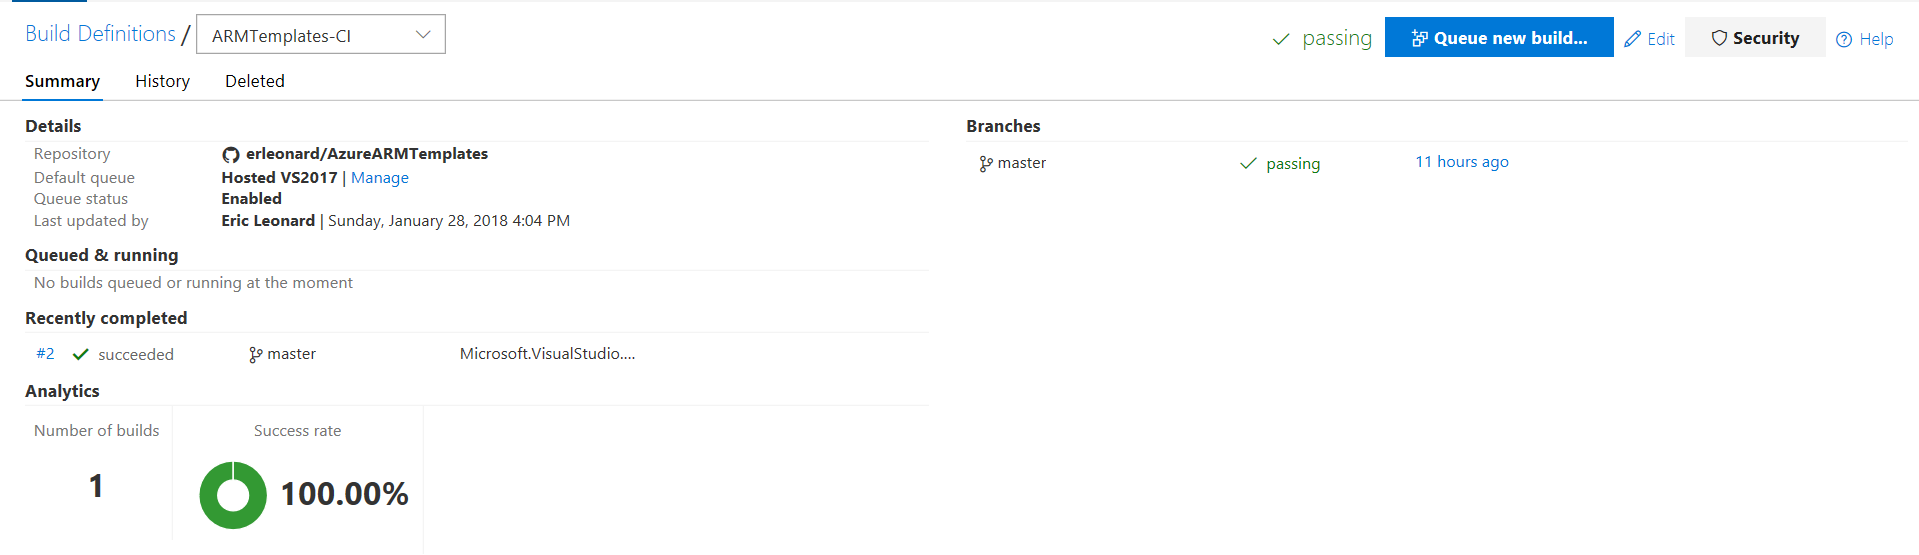
So we have covered the code editor, how the code is sourced controlled and versioned but what about testing and debugging; enter Visual Studio Team Services. VSTS allows for Continous Integration (CI) so that every time I commit code to my repository in GitHub, it will automatically build and test my code. Here are the steps to accomplish this.
- If you don’t have a VSTS account, you can create one here: https://www.visualstudio.com/team-services
- Create a new Project and ensure version control is set to Git.
- Click Build and Release, and then click Builds.
- Click “+ New definition”.
- Select the Empty build template
- Provide a name and choose “Hosted VS2017” for Agent queue.
- Click the Get sources task and select GitHub.
- Provide a connection name and then click the Authorize using OAuth button.
- A new window will popup and sign-in to GitHub and authorize access to your VSTS account.

- Once your GitHub account is authorized, select your repository.
- Click on the + sign in Phase 1 to add a Task.
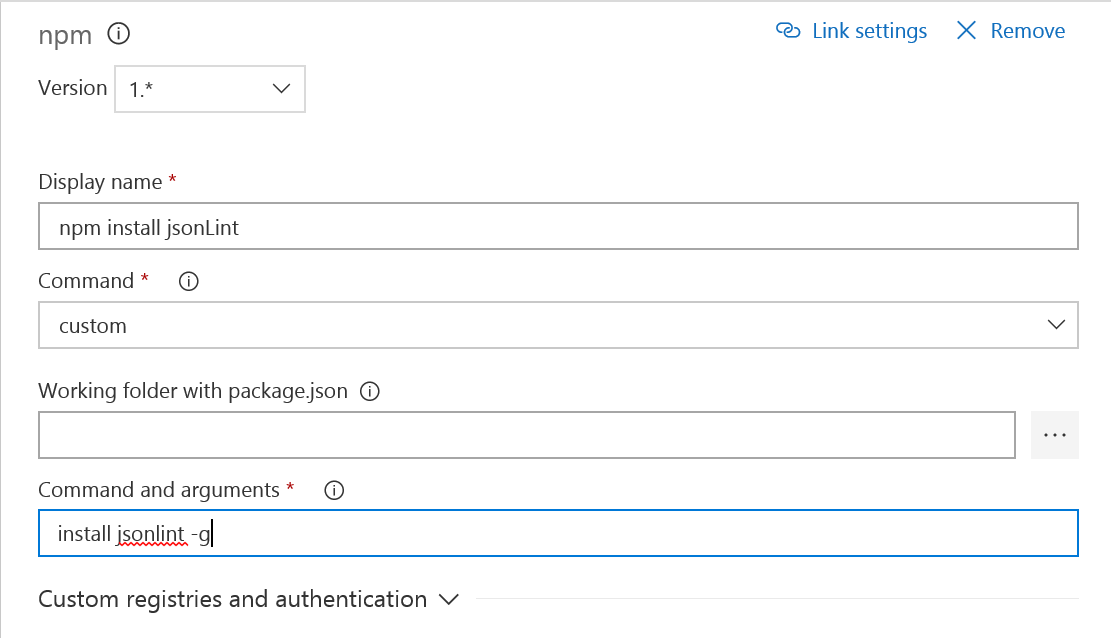
- In the Add Task window, search for NPM and click Add.
- For this task, we will be installing jsonLint to validate only our JSON syntax. Provide the following information:
- Name: npm install jsonLint
- Command: Custom
- Command and arguments: install jsonlint -g
- Add another task, search for Command line and click Add.
- This task we will run jsonLint against the ARM template.
- Display name: Run jsonLint on ARM template
- Tool: jsonlint
- Arguments: azuredeploy.json
- Optional, you can add another task to run jsonLint against the parameter file for your ARM template.
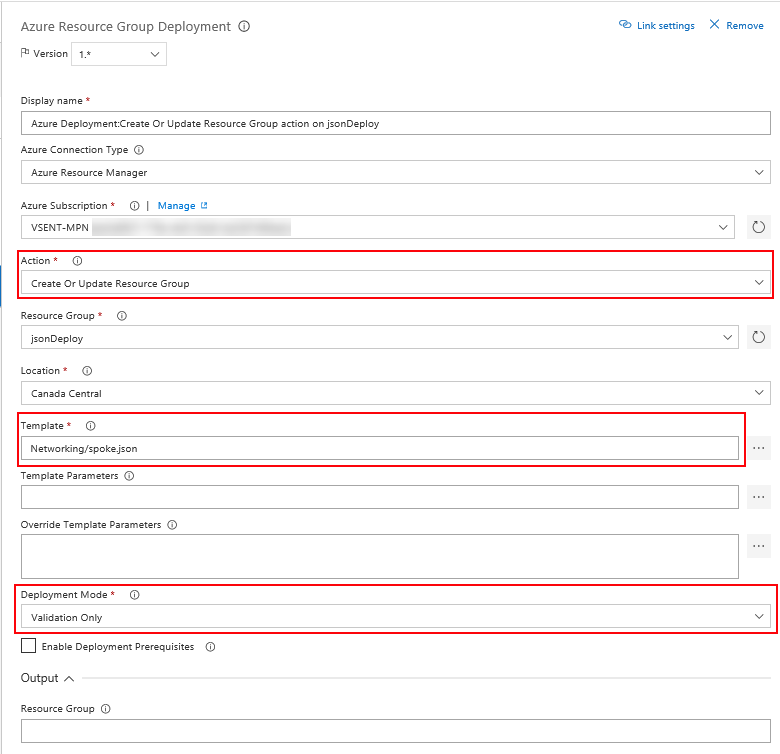
- Add another task, search for Azure Resource Group Deployment and click Add.
- This task will validate the resources provided in your template to deploy into Azure.
- Display name: Validate Deployment of ARM Template
- Subscription: Select the subscription you wish to do your deployment to
- Action: Create or Update Resource Group
- Resource Group: jsonDeploy
- Location: Select your desired location
- Template: Select the ARM template
- (Optional) Template Parameters: Select the parameter file for the ARM template
- Deployment Mode: Validate Only
- Click on Save & Queue and select Save.
The last part is that we need to enable Continous Integration to automatically test the ARM template every time there is a commit to the repository.
- Continuing from the previous step, click on Triggers.
- Under Continuous integration, click on your repository and click on the checkbox to enable continuous integration.
- Save one more time, and we are done.
The next time code is committed to the repository, VSTS will detect the commit and run the requested build tasks to validate and debug the ARM template.